A Bit About the Nameservers
Nameservers (older use “Name Servers”) are part of DNS (Domain Name Server) records. DNS consists of A records, Cname records, and Mail routing records, also called MX records. The nameservers deal with the web requests for your domain. They basically tell your web browser where to go to serve the information to your computer over the internet.
By default, when you type your domain into a browser you will probably see a parking page (arranged by your domain registrar). Meaning the registrar uses its own nameservers. You can updated the nameservers with the ones provided by your web host.
For now, we will cover registering and getting your domain set up to interact with your web hosting server space. This domain<->website “connection” is done through the nameservers. Every domain has to have nameservers records in order to be accessible on the internet.
The nameservers often come in pairs, and are endorsed by IP addresses. Look at this form sample for demonstration:
- ns1.bluehost.com, 162.88.60.37
- ns2.bluehost.com, 162.88.61.37
When changing the nameservers at your domain provider you will usually use only the first “name” part: ns1.bluehost.com and ns2.bluehost.com.
Changing nameservers can also be done through IP addresses. In this case you need to have access to a DNS management section.
When you sign up for a hosting plan, the web host usually sends you and email afterwards with the server’s IP. Once you have the IP address go to your domain name provider, and change the Host (A) Record within the DNS setting to reflect the new IP address. It will take an hour or two based upon what the TTL(Time-To-Live) is pre-set to.
I won’t be describing this option for the time being as it is not that frequent. It is used, for example, for GoDaddy web hosting when using a non-GoDaddy domain (meaning the domain not registered at GoDaddy).
Already know how to update the nameservers? Looking for the specific nameservers records used by popular web hosts? Well, some of them can only be found directly at your web hosting providers. Nevertheless, you might still find a few useful settings, just skip to the >> Nameservers of Well-Known Web Hosts << section below.
What Do I Need to Make Nameservers Work?
All you need is love?. But besides that: the Domain Name and Web Hosting!
I assume that you know How to Register a Domain Name or that you already have one. No harm done if you are not familiar with that. Just read on.
To make your domain “work” with your website you obviously need a web hosting service. Don’t have one yet? Reading this “Choose Your Web Host” guide will help you to find it.
Most hosting companies will send you an email with relevant hosting information, including your name servers that you will need. Just check your email-box, it will be (most likely) a part of the common “Welcome-to-Your-Host” e-mail. If not, the web host support will certainly have that information ready for you.
Note, you don’t have to worry about setting up the nameservers if you got your domain directly at your web hosting provider. In that case the web host sets the domain nameservers for you. A few good web hosts where you can get a free domain name with your hosting package:
Disclosure: We only review products and services that we believe will add value to our readers. Some of the links in this post are “affiliate links” from which we may earn commissions. Note: there is no additional cost to you! You’ll find more details on our Disclosure page. Thank you for your support!
Or go directly to Namecheap or GoDaddy ‘set up nameservers’ guides if you your domain is at respective registrars.
Obtain a Domain Name If You Don’t Have One
First off, the domain is going to have to be purchased from a registrar and have the nameservers set to your web hosting space of choice. Yes, the nameservers’ setup will be done at your domain registrar, not at web hosting provider (unless the domain is registered directly at the web host).
A domain registrar is a company or organization that provides domain registration services to businesses or individuals who want to have a specific domain name or web address.

Domain names also have what is called a TLD (Top level domain or domain extension). Most commonly used are .com, .net, .org, .edu, and .me. There are several others that are not so popular. The list goes on for special country code TLD’s as well, to list a few: .us, .ca, .co.uk, com.au, .fr, .de, .my or .in.
New domain extensions (called “donuts”) like .xyz, .dating, .media, .zone, .shop, .pizza or .boutique are going to cost a bit more than the common .net or .com domains.
You’ll get an idea by browsing the above registrars and searching for your new domain.
Questions About Domains and Nameservers
Three most common questions asked:
- Q: Do I need to know the web hosting nameservers before registering my domain?
- A: No, not needed. Normally, first you just register your domain. Then you sign up for your chosen web hosting service. The web host will provide you with the nameservers for your domain.
- Q: Do domain registrars charge any additional fees for custom nameservers?
- A: Nope. No additional fees should be charged. If you bump into a domain registrar that does that, run away. The domain registration fee covers the Nameservers as they are the core part of domain name operations.
- Q: How often can I change or update the nameservers?
- A: As often as you need to. Just be aware that for changes to become fully functional you have to wait up to 48 hours (usually they work within 24 hours).
Setting Up Nameservers
Once you have thought about the name of your domain and have paid for the domain you chose, you will then need to set the nameservers of this domain. Depending on where you buy your domain, the process of changing the nameservers can be different.
By now, you should have/know:
- The Nameservers Information for your domain. Normally, hosting companies will send you an email with your server space details.
- Domain Registrar Access (e-mail/password). Most registrars will have you fill in “Account Details” (including your username and password) so you can log in and manage your new domain.
Every hosting company has pre-set nameservers for their hosting packages.
If you have purchased a shared hosting platform together with your domain (you have probably got a free domain deal), then the domain nameservers should already be set up and you won’t have to worry about any settings.
Most of you have probably registered your domain with one of the popular domain companies. Now, you would like to “attach” your domain to your website. Ho do you do that? Just start pointing your domain to where your website is hosted!
All you need to do is change the nameservers and wait the appropriate propagation times. Sounds easy, right? Sometimes it’s not so straightforward. To get your nameservers changed, you will want to log into your registrar and navigate to the DNS or Nameserver section in your account.
To make it easier to understand, we will explain this setup process individually for each of these two most popular domain registrars:
I believe these two examples should be sufficient to demonstrate the nameservers set-up process. Changing nameservers at other domain registrars is quite similar. The procedure always goes through “Manage DNS” or “Custom Nameservers” sections where you can make your updates and set up new nameservers.
Int the ‘worst case scenario’?, bear in mind that you can always get help from your domain service or web hosting providers.
Change Namecheap Nameservers
Let’s deal with the case when you need to change or modify nameservers at Namecheap domain registrar. Now, reminding again, this scenario only applies when you don’t have a web hosting service with Namechaep, only your registered domain.
- Go to namecheap.com. Log into your Namecheap account (enter your username, password):

1. Sign-In | Namecheap Nameservers
- Right after signing-in you’ll see your “Dashboard”. Select the domain you want to change the nameservers for (click on the picture below to see it in lightbox).

- Scroll down a bit, locate the DNS Management Section with a drop-down menu. There will be 3 options to select from: “Namecheap BasicDNS”, “Namecheap Web Hosting DNS” and “Custom DNS”. Select the Custom DNS item. Refer to the screenshot below.

As you can see, in the “Custom DNS” settings we have our Siteground hosting nameservers. Of course, if we move to another web host, the nameservers will change. We are satisfied with Siteground, still, in the future, no-one knows, we might consider another hosting provider (as part of our ongoing “web hosting” journey ?). The takeout: your website can be moved to any web hosting company, all you need is to update the nameservers accordingly!
Not to forget, the nameserver change is not going to happen “instantly”. The propagation time can vary depending on many network factors.
Change GoDaddy Nameservers
You are going to modify your GoDaddy’s domain nameservers to have them pointing to your web hosting provider. Granted, that your web hosting is not Godaddy.
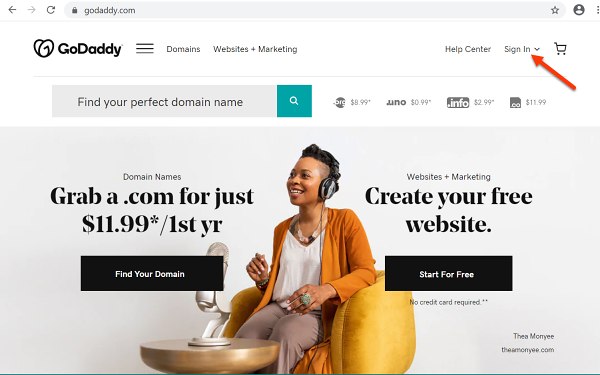
- Go to godaddy.com. Sign into your GoDaddy domain account (Domain Control Center). Follow the screenshots bellow. I don’t think they are all necessary, but some beginners like to see it in layman’s perspective.


1b. Sign-In Box | GoDaddy Domain Account
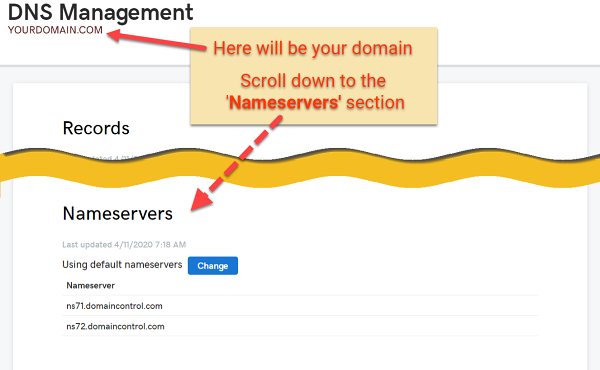
- You will be brought to the “My Products” screen, that lists your domain names and other products you may have. Pick the domain you need to make the nameservers updates to. Click on the “Manage” button to proceed to the “Settings” page. Scroll down to “Additional Settings” block. Here you’ll find the “Manage DNS” link that will take yo to the the “DNS Management” panel. In the “DNS Management” panel, scroll down to the “Nameservers” section.
If your domain uses Godaddy’s nameservers you will see various DNS entries in the Records panel. You don’t have to worry about them now.
By default, your domain will have GoDady’s nameservers, something like ns71.domaincontrol.com and ns72.domaincontrol.com (or any ns’NumberNumber’.domaincontrol.com records).


2c. DNS Management | GoDaddy Nameservers
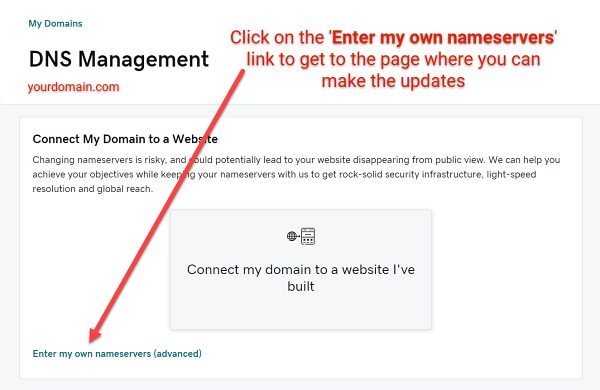
- Next to the “Using default nameservers” click on the “Change” button.
You’ll get to the next screen “Connect My Domain to a Website”. Click on the link below “Enter my own nameservers (advanced)“.
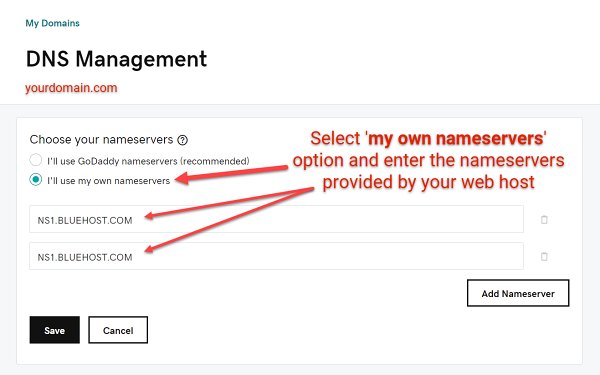
In the ‘Choose Your Nameservers’ form enter the custom nameservers of your web host or web service. If you need more lines/boxes use the ‘Ad Nameservers‘ button (down-right). Then save your changes!
Right after the changes you will see a notification about the update being in process. Note, at this point you will still see the ‘Records’ panel with various default data. But after refreshing the page (or after a couple of minutes) the records will be unavailable: “We can’t display your DNS information because your nameservers aren’t managed by us“.
Done and done! Now you have to wait for the new nameservers to be processed.

3a. Connect Your Domain to a Website | GoDaddy Nameservers

3b. Set Your Own Nameservers | GoDaddy

3c. Nameservers Notification After the Update | GoDaddy

3d. Custom Nameservers Updated | GoDaddy
In our GoDaddy’s “Custom Nameservers” screenshot we use the Bluehost nameservers. Yes, we have another small website at Bluehost. We carry-out a wide range of tests to get a better picture of their services. So don’t forget to enter your web host nameservers in there!
Nameservers Propagation
After the nameserver change, a network background process occurs called propagation. Propagation of a DNS change like nameservers, generally takes around 24 hours for all web traffic to start seeing the content of your website (based on my experience, usually it is no more than 12 hours). In some cases it could take up to 48 hours. For any longer propagation time you need to contact the registrar and/or your web hosting company.
There are several good websites you can use to check if your domain is propagated to your new server or not. I bring this up because propagation seems to be where most of the confusion comes from. If you are like me when I started, I had no idea what DNS or nameservers even were.
Checking the Propagation Change
Dnschecker.org: DNSchecker allows you to put in your domain name and check different DNS records and if they have propagated to different areas around the world. What you are looking for is NS in the dropdown.
Viewdns.info: ViewDNS has several different tools available to use to check different things, but what you are looking for is the “DNS propagation checker tool” which you can search for domains to check propagation with.
Whatsmydns.net: WhatsmyDNS offers the same thing that DNSchecker.org offers. You get the ability to search a domain and different types of dns records. Again, what you are looking for is NS in the dropdown next to the search.
Site24x7.com: When you first land on this website, it can look intimidating. If you click “Tools” at the top, you can either wait for the banner to change to “DNS Analysis of your Domain” or click on “Check Website Availability” from the list of Server Administrator Tools.

Nameservers of Popular Web Hosts
Lost your web host’s welcome email with nameservers instructions? You should always try to get the most up-to-date nameservers information directly at your web host website or from their support.
The list below hasn’t been fully tested and some nameservers do depend on the web hosting plan you have purchased. It is impossible to list all the nameservers, but you can at least check the nameserver formats, segments and samples.
|
Web Hosts |
Nameservers |
|---|---|
| Bluehost | shared: ns1.bluehost.com. ns2.bluehost.com reseller: ns1.rhostbh.com, ns2.rhostbh.com |
| GoDaddy | *sample: ns72.domaincontrol.com, ns73.domaincontrol.com Can be any form: nsNN.domaincontrol.com (N-number) |
| Dreamhost | ns1.dreamhost.com, ns2.dreamhost.com, ns3.dreamhost.com |
| InMotion | ns1.inmotionhosting.com, ns2.inmotionhosting.com reseller: ns1.servconfig.com, ns1.servconfig.com |
| Siteground | *sample: ns1.us46.siteground.us, ns2.us46.siteground.us For US based hosts. Can be any form: ns1-2.usNN.siteground.us |
| Hostgator | *sample: ns8430.hostgator.com, ns8431.hostgator.com Can be any form: nsNNNN.hostgator.com |
| A2Hosting | ns1.a2hosting.com, ns2.a2hosting.com, ns3.a2hosting.com, ns4.a2hosting.com |
| BigScoots | ns1.bigscoots.com, ns2.bigscoots.com |
| HostPapa | ns1.hostpapa.com, ns2.hostpapa.com |
| Namecheap | dns1.namecheaphosting.com, dns2.namecheaphosting.com |
| WebHostingPad | ns5.webhostingpad.com, ns6.webhostingpad.com (or any nsNumber.) |
