How to manage VLAN configurations with VMware

Effective network management is crucial for businesses seeking to enhance performance and security. One powerful tool in achieving this is the Virtual Local Area Network (VLAN), especially when combined with VMware technology. 

This article will guide you through the essentials of managing VLAN configurations within VMware, helping you understand the benefits, setup processes, and best practices for optimizing your network. 

Whether you’re looking to improve security, streamline administration, or boost network performance, mastering VLANs can make a significant difference in your virtualized environment. 

Let’s dive in and explore how to harness the power of VLANs with VMware.

Shop VMware private cloud

What is VLAN in VMware?

A virtual local area network (VLAN) is a logical collection of workstations, servers, and network devices connected to the same local area network (LAN) despite being physically separated. 

With the help of a VLAN, a group of computers and users can simulate a single LAN and share a single broadcast and multicast domain to communicate with one another. VLANs are used to achieve scalability, security, and ease of network management. They can swiftly adapt to changes in network requirements and facilitate the migration of server and workstation nodes.

A VLAN functions at layer two of the network, or the Ethernet level, just like the LAN it sits on top of. VLANs divide a single switched network into a collection of overlapping virtual networks that can suit various functional and security needs. 

This segmentation eliminates the need for several unique physical networks for different use cases. Network engineers use VLANs to improve performance, tighten security, and simplify administration.

{
  "@context": "https://schema.org",
  "@type": "VideoObject",
  "name": "How to Manage VLAN Configurations with VMware ESXi",
  "Description": "Learn how to manage VLAN configurations with VMware ESXi on a Windows operating system. 1. Set up your network on ESXi VLAN Log into VMware ESXi. The main page will appear with server specs. 2. Set up the VMware VLANs Choose your ports. ESXi uses ports 2-4000 to handle traffic. Set your switches. Open the Virtual switches tab and add the appropriate number of switches. 3. Continue network setup on the VM OS. Finalize the installation. Input a private IP address and a subnet mask in the Windows Server Manager. You're ready to go! You can now use your ESXi IP address on your Windows instance. For the full article: https://www.liquidweb.com/kb/how-to-configure-vlan-with-vmware-esxi/",
  "thumbnailUrl": "https://i9.ytimg.com/vi_webp/5ZjOCWf2kIQ/sddefault.webp?v=617aa805&sqp=CJT29o4G&rs=AOn4CLA2Jgkji8hk7CMDQMRyYWYLS8FpOg",
  "uploadDate": " 2021-10-28T15:53:38Z",
  "duration": "PT51S",
  "publisher": {
    "@type": "Organization",
    "name": "Liquid Web",
    "logo": {
      "@type": "ImageObject",
      "url": " https://res.cloudinary.com/lwgatsby/f_auto/www/uploads/2017/06/press-room-lw-logo.png",
      "width": 190,
      "height": 41
    }
  },
  "embedUrl": "https://www.youtube.com/embed/5ZjOCWf2kIQ"
}

How to create a VLAN using VMware

For this instance, VMware ESXi is used. This software is installed onto the physical hardware and allows you to split up your single physical server into multiple servers known as virtual machines (VMs). 

There are a few different ways to set up your VMware environment. Here are two ways to get started with minimum requirements for each.

Option 1

  • Dedicated server.
  • Root access.
  • The ability to install an operating system (OS) or ESXi software.

Note: Most hosting providers have an unmanaged dedicated server that manages the hardware while you manage the software.

Option 2

  • VMware environment.
  • Access to VMware ESXi.

Note: Liquid Web’s VMware private cloud is a viable solution aside from the other providers that are out there.

How to manage VLAN configurations with VMware ESXi

With Liquid Web VMware hosting, VMware ESXi comes pre-installed and configured. However, you will need to make changes to the configuration settings to customize and manage your VLANs according to your business needs.

1. Set up your network on ESXi VLAN

To log into VMware ESXi, you need to obtain your ESXi host IP address. Using the IP address in your web browser, log into VMware ESXi to set up the network for your VMware VLAN.
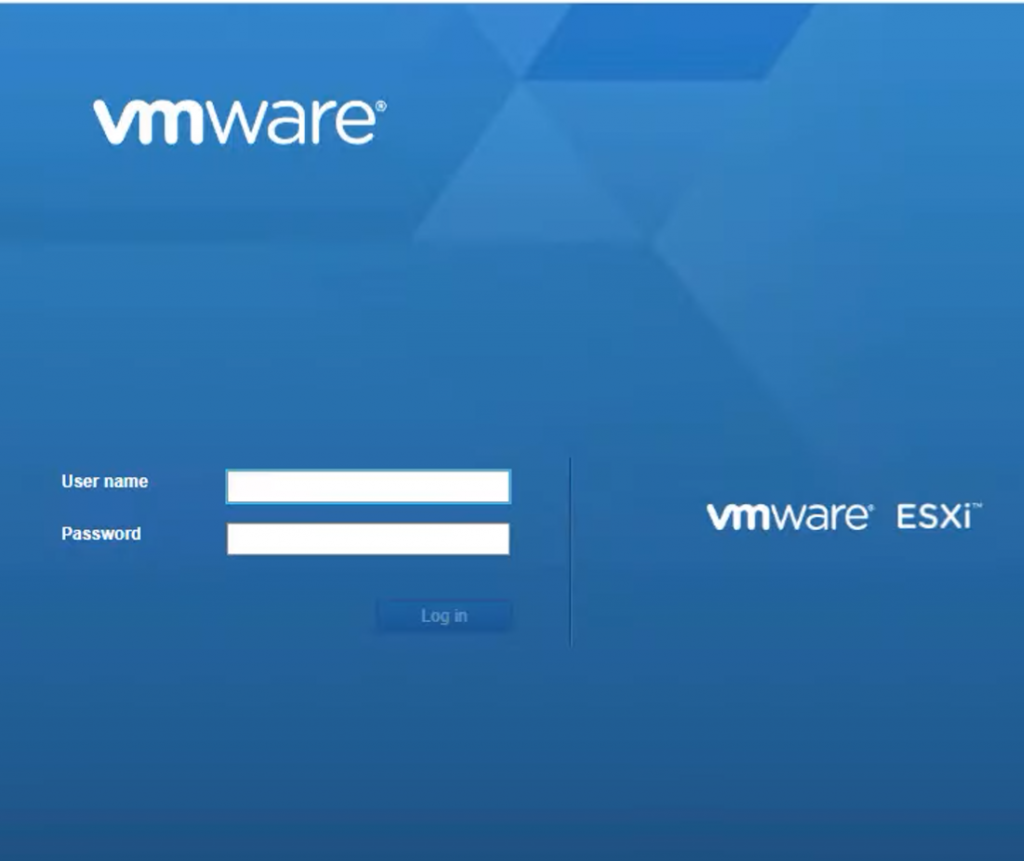
How to manage VLAN configurations with VMware

Once logged in, the main page appears with the server specifications and management options.
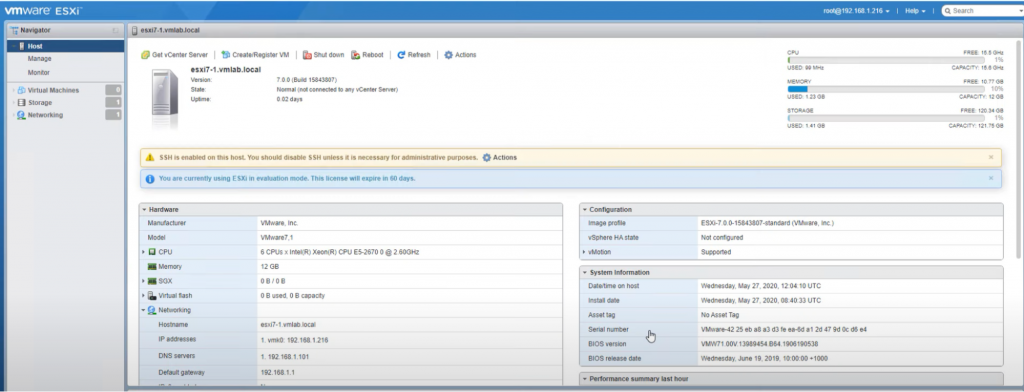
How to Manage VMware VLAN Configurations. Once logged in, the main page appears with the server specifications.

2. Set up the VMware VLANs

Port groups are used for grouping network interfaces, making the task of traffic routing more organic. For example, ESXi uses ports 2 through 4000 to handle traffic. Once the chosen ports are input, click the Networking tab on the right-hand side.
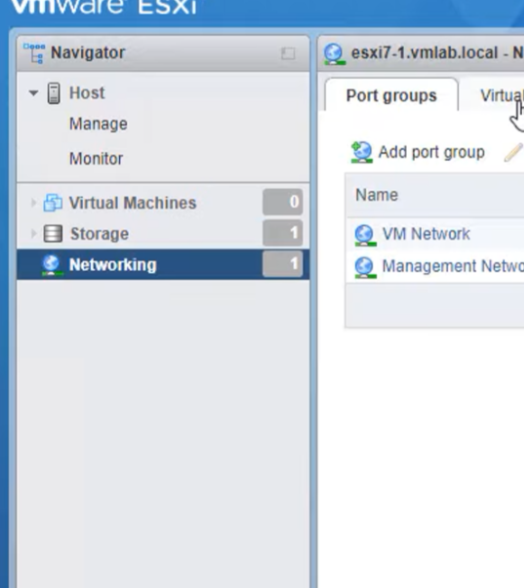
How to Manage VMware VLAN Configurations. Port groups are used for traffic routing. For example, ESXi uses ports 2 through 4000 to handle traffic. Once the chosen ports are input, click the Networking tab on the right-hand side.

Click the Virtual switches tab.
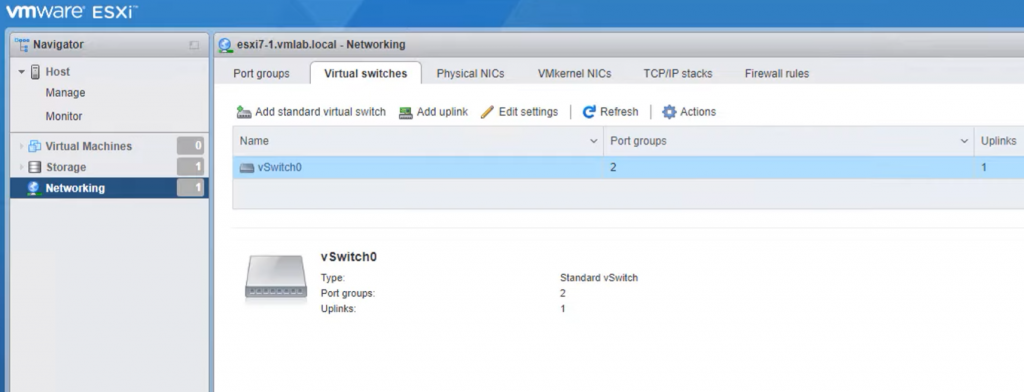
How to Manage VMware VLAN Configurations. Click the Virtual switches tab.

Setting up the switches on ESXi depends on how many network interface cards (NICs) you have on the server. In the Virtual switches tab, add the appropriate number of switches, ensuring that each uplink is connected to a NIC routed to the correct port to function.
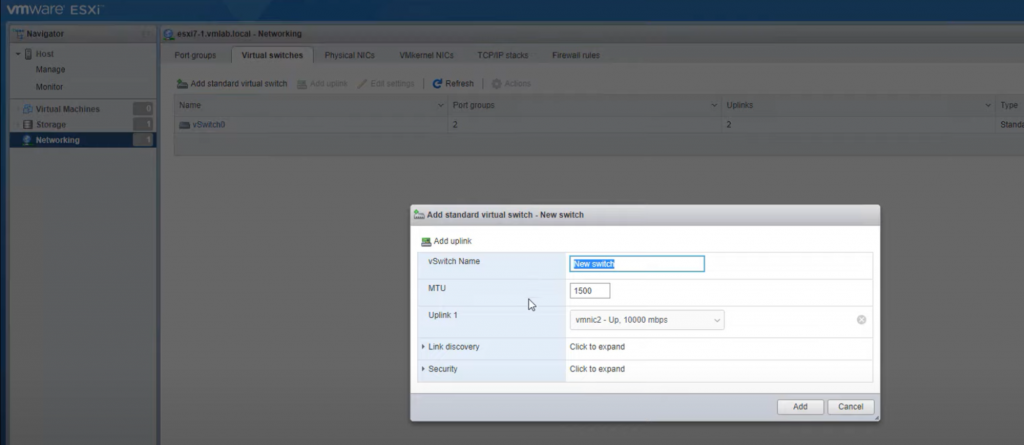
How to Manage VMware VLAN Configurations. Setting up the switches on ESXi depends on how many network interface cards (NICs) you have on the server. In the Virtual switches tab, add the appropriate number of switches, with each uplink being a NIC routed to the correct port to function.

3. Continue network setup on VM operating system

Now that the setup process in VMware on the host server has begun, finalize the installation on the guest VM’s operating system. The OS used in this tutorial is Windows server 2016.

From Server Manager (the management console in the Windows Server OS), click Local Server on the left-hand sidebar. Next, click the IPv4 address assigned by DHCP, IPv6 enabled text next to Ethernet1.
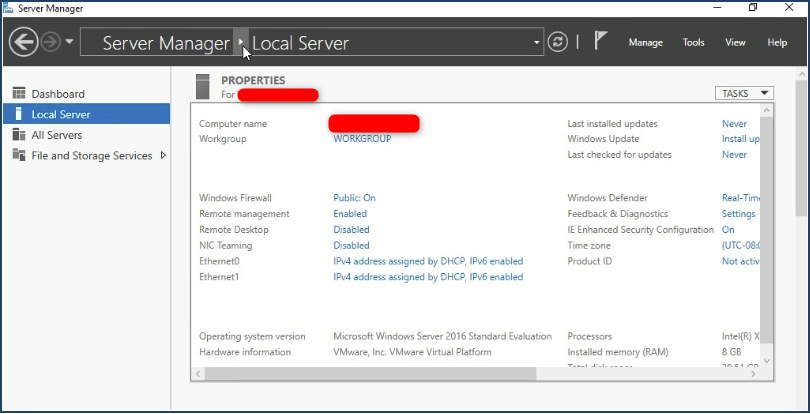
How to Manage VMware VLAN Configurations. From Server Manager (the management console in the Windows Server OS), click Local Server on the left-hand sidebar. Next, click the IPv4 address assigned by DHCP, IPv6 enabled text next to Ethernet1.

Right-click Ethernet1 and select Properties from the drop-down menu.
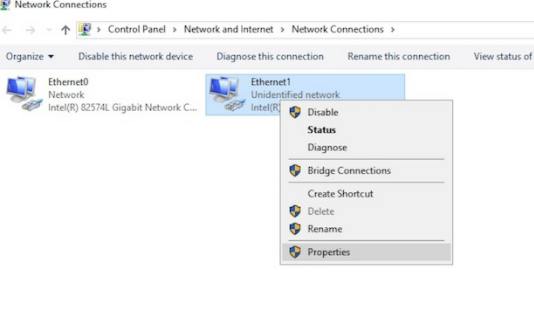
How to Manage VMware VLAN Configurations. Right-click Ethernet1 and select Properties from the drop-down menu.

Double click Internet Protocol Version 4 (TCP/IPv4) to open the Internet Protocol Version 4 (TCP/IPv4) Properties menu.
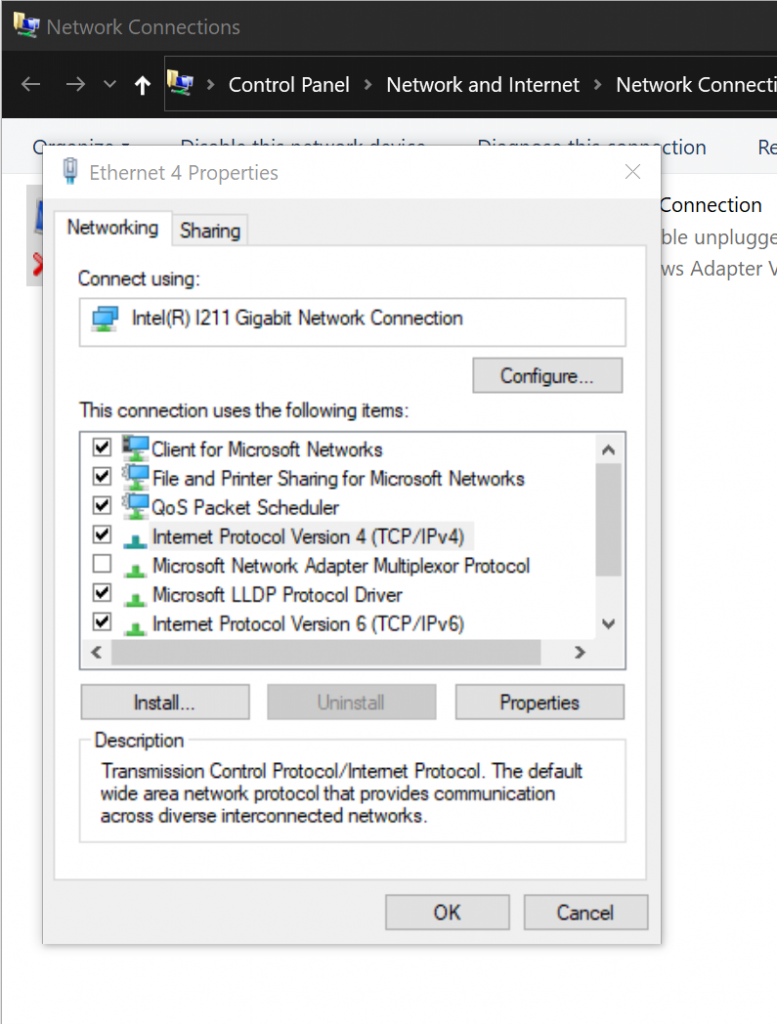
How to Manage VMware VLAN Configurations. Double click Internet Protocol Version 4 (TCP/IPv4) to open the Internet Protocol Version 4 (TCP/IPv4) Properties menu.

Click the radio button for Use the following IP address and enter a private IP address and a subnet mask. Enter the IP address of your desired DNS server and an alternate if applicable. Click OK once complete.

How to Manage VMware VLAN Configurations. Click the radio button for Use the following IP address and enter a private IP address and a subnet mask. Enter the IP address of your desired DNS server and an alternate if applicable. Click OK once complete.

You are now ready to use your ESXi IP address on your Windows instance.

Bottom line on configuring VMware VLAN

Configuring and deploying VMware VLAN allows you to create separate private networks in which only virtual machines attached to that network can communicate. With this guide, you can vastly refine your security and use this superb software to hone your network’s performance.

Are you looking for a managed VMware solution with support for these kinds of settings? Liquid Web’s VMware private cloud is the solution for you. 

Check out our plans or contact our sales team today to begin the process of getting your environment.

Shop VMware private cloud
Contact us

VMware VLANs FAQs

Using VMware VLAN (Virtual Local Area Network) offers several benefits.

  1. Enhanced security: VLANs provide an additional layer of security by separating sensitive or critical VMs from other network parts. By assigning VMs to specific VLANs, you can control access and restrict communication between different VLANs, thereby reducing the risk of unauthorized access or malicious activity.
  1. Improved performance: Using VLANs to segregate network traffic can optimize network performance within your VMware environment. VLANs help reduce broadcast traffic and network congestion by limiting the scope of broadcast messages to specific VLANs. This improves overall network performance and ensures efficient communication between VMs.
  1. Network segmentation: VLANs allow you to segment your network into separate broadcast domains logically. By creating different VLANs, you can isolate traffic between other groups of virtual machines (VMs) based on their VLAN membership. This segmentation enhances network security and improves performance by reducing unnecessary broadcast traffic.
  1. Flexibility and scalability: VLANs provide flexibility and scalability in your VMware infrastructure. You can easily create new VLANs or modify existing ones to accommodate changes in your network requirements. This agility enables you to adapt and scale your virtualized environment without significant physical network modifications.
  1. Cost savings: Using VMware VLAN can save costs by reducing the need for physical network infrastructure. With VLANs, you can create virtual networks within your existing physical network, eliminating the need for additional physical switches, routers, and cables. This results in lower hardware costs and simplified network architecture.
  1. Simplified network management: With VLANs, you can simplify network management in your VMware environment. Instead of managing separate physical networks for different groups of VMs, you can use VLANs to separate and manage network traffic within the virtual environment logically. This allows for more efficient administration and reduces the complexity associated with physical network configurations.
  1. Seamless virtual machine mobility: When using VMware VLAN, VMs can be easily migrated between hosts using features like vMotion or Storage vMotion. As long as the target host has the necessary network infrastructure and VLAN configurations in place, the VMs can retain their VLAN membership during the migration process, ensuring continuity of network connectivity.

By leveraging VMware VLAN, you can achieve network segmentation, enhance security, simplify management, improve performance, and gain flexibility and scalability, ultimately optimizing your virtualized infrastructure.

No, a single virtual switch in VMware cannot directly support multiple VLANs. In VMware, a virtual switch is associated with a single VLAN at a time. Each virtual switch operates as a single broadcast domain, meaning all the connected virtual machines (VMs) within that virtual switch are part of the same VLAN.

However, it is possible to have multiple virtual switches, each associated with a different VLAN. By creating multiple virtual switches and assigning each switch to a specific VLAN, you can achieve VLAN segmentation within your VMware environment. This allows you to isolate traffic between different groups of VMs based on their VLAN membership.

To implement multiple VMware VLANs, you would typically create separate virtual switches for each VLAN and assign the appropriate VLAN ID to each switch. Then, you can connect the desired VMs to the corresponding virtual switches based on their VLAN requirements. This configuration enables the VMs to communicate within their respective VLANs and maintains VLAN separation.

It’s important to note that VMware offers different virtual switch options, such as the vSphere Standard Switch (VSS) and the vSphere Distributed Switch (VDS). Both switch types support VLAN tagging and can be used to create separate virtual switches for different VLANs.

By utilizing multiple virtual switches with associated VLANs, you can achieve network segmentation and control traffic flow between VMs based on their VLAN membership.

Yes. You can migrate virtual machines (VMs) with VLAN configurations between hosts in a VMware environment. VMware provides several migration tools, such as vMotion and Storage vMotion, that allow you to move VMs from one host to another without disrupting their operation.

When using VMware VLANs (Virtual Local Area Networks), there are several limitations and considerations to remember. Here are some important ones:

1. VLAN tagging support: VMware supports VLAN tagging, which allows you to assign virtual machines (VMs) to specific VLANs. However, you must ensure that your network infrastructure supports VLAN tagging and is properly configured to handle VLAN traffic.

2. VLAN ID limitations: Different versions of VMware have different limits on the number of VLAN IDs that can be used. For example, VMware ESXi 6.0 supports up to 4096 VLAN IDs, while earlier versions may have lower limits. Ensure that your VMware version supports the number of VLANs required for your environment.

3. Performance considerations: VLANs may have some overhead associated with VLAN tagging and processing. This can result in a slight performance impact, especially when handling many VLANs or high network traffic. It is crucial to properly design and plan your network infrastructure to minimize any performance impact.

4. Network segmentation: VLANs provide network segmentation, allowing you to isolate traffic between different groups of VMs. However, remember that VLANs alone do not provide security or isolation at the same level as physical networks. Additional security measures, such as firewalls and access controls, should be implemented to protect the VLAN traffic.

5. VLAN misconfigurations: Improper VLAN configurations can lead to network connectivity issues and miscommunication between VMs. It is essential to carefully plan and verify your VLAN configurations to avoid misconfigurations impacting network connectivity.

6. VLAN scalability: Depending on your VMware environment and network infrastructure, there may be scalability limitations when using VLANs. As the number of VLANs and VMs increases, the complexity of managing and configuring VLANs also increases. It is important to consider scalability and plan your VLAN implementation accordingly.

7. Network switch configuration: The physical switches connected to your VMware environment must be properly configured to handle VLAN traffic. This includes configuring the switch ports to allow VLAN tagging and trunking and configuring the appropriate VLAN IDs. 

8. Compatibility with virtual switches: VMware offers different virtual switch options, such as the vSphere Standard Switch (VSS) and the vSphere Distributed Switch (VDS). When using VLANs, ensure that your virtual switch configuration supports VLAN tagging and trunking and is compatible with your network infrastructure.

Note on the original publish date: This blog was originally published in October 2021. It has since been updated for accuracy and comprehensiveness.

The post How to manage VLAN configurations with VMware appeared first on Liquid Web.